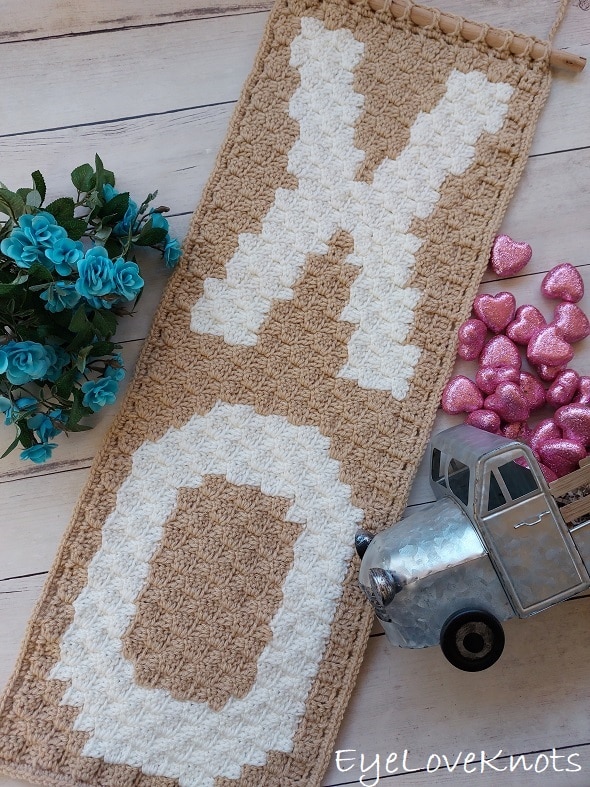
This is a free crochet pattern for how to crochet an easy corner to corner XO wall hanging perfect for Valentine’s Day decorating, a gallery wall, nursery decor, anniversary or wedding gift and even just the casual every day decor.
Find the free crochet pattern instructions below, or purchase a printer-friendly, ad-free PDF on Ravelry by clicking here.
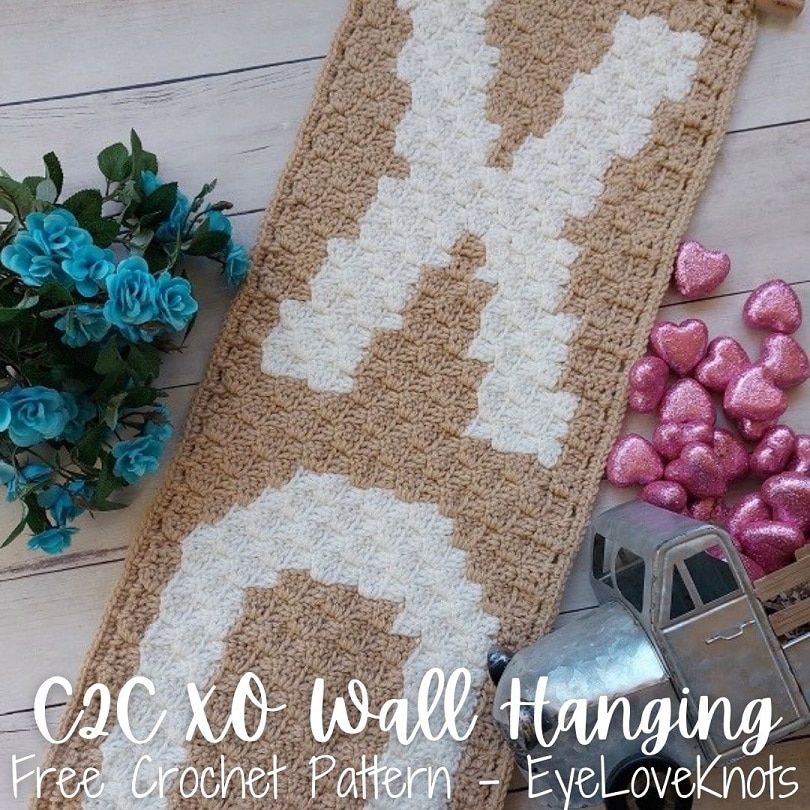
I had this vision for Valentine’s decorating this year, and that was this wall hanging above my entryway table with a vase full of tealish blue flowers next to it, and a metal pick up truck under it full of something pink in the bed. It turned out exactly as I pictured it! But the lighting in my house is not good, and I could not get a picture of it in action that I was happy with so flat lay it is… For now… I have a big backdrop coming any day now, and I have plans for future my home decor pictures.
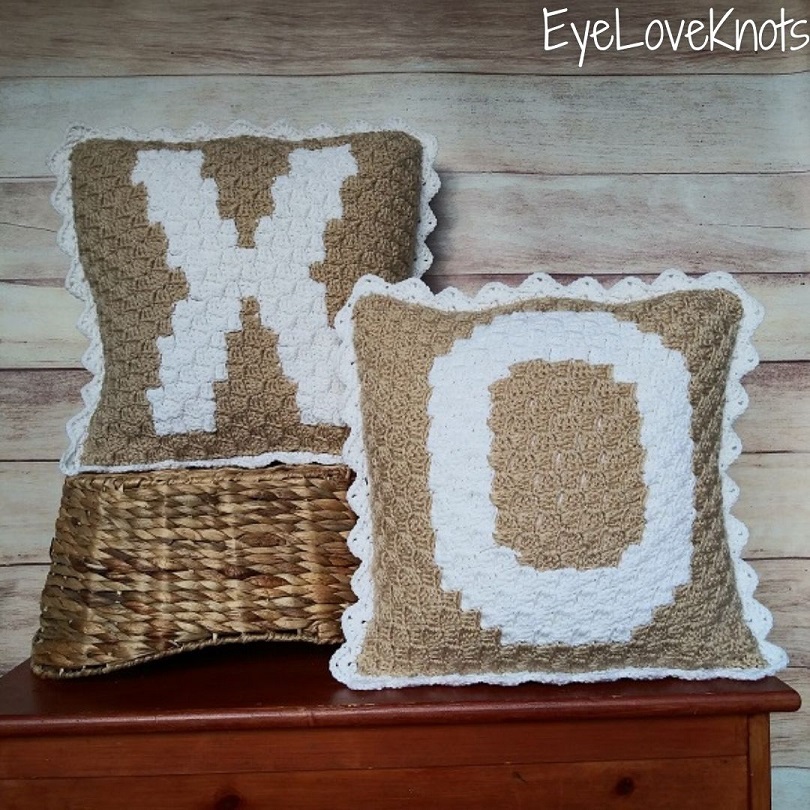
You might also like this 18″ C2C Alphabet Throw Pillow so you can make a matching set for your home!
If you would like to grab a free copy of the PDF for this pattern, make sure to check out the Pattern Notes section below.
Ad-Free, Printer-Friendly PDF:
If you would like a PDF version of this post, you may get one through either my EyeLoveKnots Etsy Shop, Ravelry or LoveCrochet Shop for a small fee. This fee is to compensate for the views lost when you no longer need to return to the blog to for the information, as you will have your own copy. Plus! It helps fund supplies for new projects to share with you!
Shop EyeLoveKnots Etsy: C2C XO Wall Hanging.
Shop EyeLoveKnots LoveCrafts: C2C XO Wall Hanging (sub 02.01).
Are you a Raveler? Share your version of this project on Ravelry – C2C XO Wall Hanging.
Save this to your Favorites (sub 02.01) – AllFreeCrochet, FaveCrafts, Cheap Thrifty Living, DIYideaCenter, Crochet Pattern Bonanza, AllFreeHolidayCrafts, Free Crochet Tutorials, The Free Crochet Family
Materials:
- 570 Yards Total of Worsted Weight Yarn – I used Red Heart’s Super Saver in Buff (255 Yards) and Soft White (315 Yards)
- H8/5mm Crochet Hook
- Tapestry Needle for Weaving in Ends
- 12″ or Longer Wooden Dowel for Hanging – I got mine at a local bird shop
Material Notes:
Yarn Alternatives: Caron’s One Pound, Bernat’s Super Value. I like these and Red Heart Super Saver for my home projects because it’s durable, and machine washes and dries ok.
If size isn’t essential to your project you can use any yarn from your stash with respective crochet hook.
Red Heart Super Saver is an inconsistent yarn. While the overall gauge isn’t important, it is important that the gauge for both yarns that you use are the same. I had to use an H8/5mm for my Soft White, and I9/5.5mm for my Buff.
Time Spent:
This wall hanging took me about 7-8 hours to complete.
Measurements:
- Fabric: 10 3/8″ Wide
- From Nail to Dowel: 10″ Tall
- From Nail to Bottom: 44″ Tall
Gauge:
5 Boxes = 4.25″ Wide by 4.13″ Tall
Abbreviations (US Terms):
- DC – Double Crochet (Photo Tutorial)
- SC – Single Crochet (Photo Tutorial)
- C2C – Corner to Corner [in DC] (Photo Tutorial)

Pattern Notes:
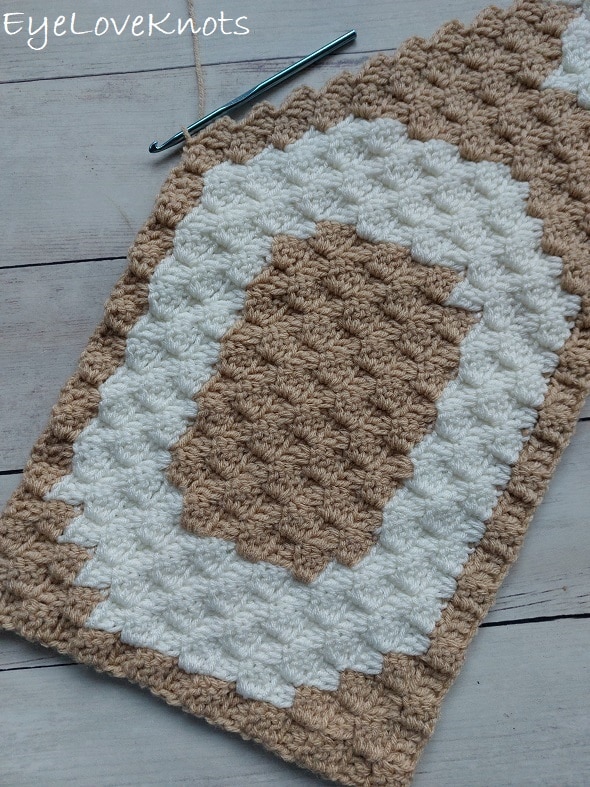
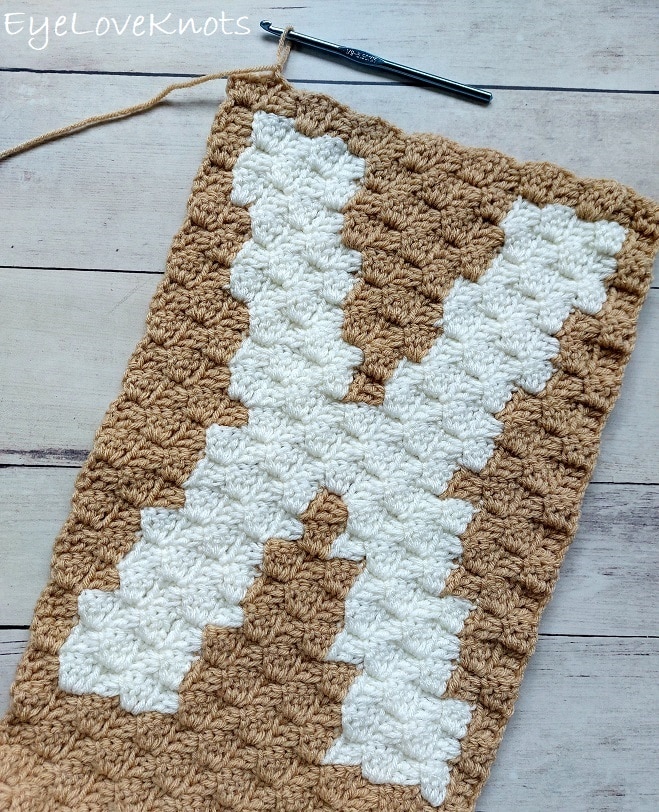
Project grows from the bottom right corner upward.
Row 6 is the right side of the fabric. Bring all tails to the wrong side.
This pattern is written with colors and boxes only. If you would like more details on how to work the corner to corner technique, check out my Corner to Corner in Double Crochet Photo Tutorial.
Beginning chain 2 counts as a double crochet, but beginning chain 1 doesn’t.
A box is comprised of four double crochet’s.
The “space under the same chain joined to” is defined as the space between the last two double crochets of the previous rows box.
Working the final double crochet into the top of the chain from the previous row helps to keep the edge more even. After completing the first box, you may also need to lightly tug on it to keep it even as well. The border will cover up any unevenness in the end.

Through 02/03/22 at 11:59pm EST, you can grab a free copy of the PDF for the C2C XO Wall Hanging on Ravelry using code FREECROCHET202203. I earn my income from the number of pageviews my blog sees, so please do not share the code, but instead share the link to this post so others can find it. Thank you!
If you’re viewing this after 02/03/22, you can still get a copy of the PDF on sale 50% off on Ravelry or on Etsy using code NEWCROCHET202203 until 02/06/22 at 11:59pm EST.
C2C XO Wall Hanging Video Tutorial, Part 1:
C2C XO Wall Hanging Video Tutorial, Part 2:
C2C XO Wall Hanging Video Tutorial, Part 3:
C2C XO Wall Hanging Video Tutorial, Part 4:
C2C XO Wall Hanging Video Tutorial, Part 5:
C2C XO Wall Hanging Video Tutorial, Part 6:
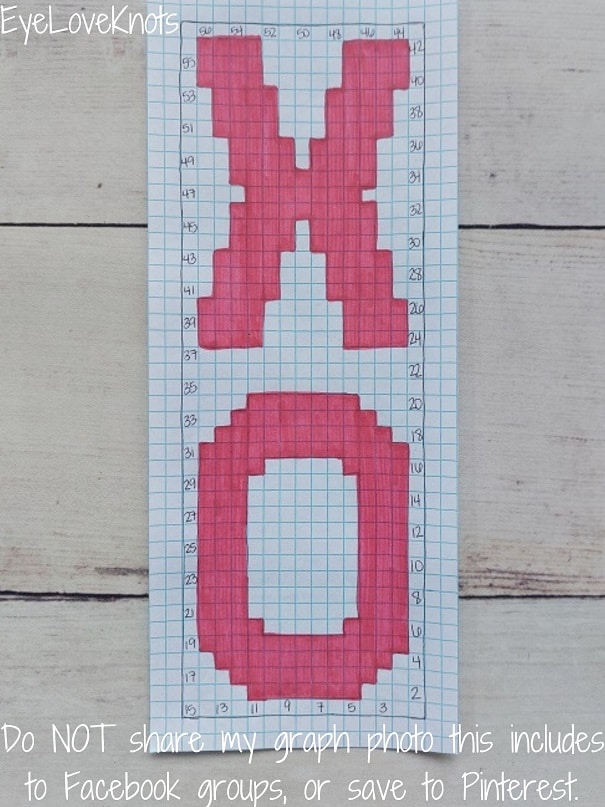
C2C XO Wall Hanging Graph:
As a blogger, I rely on views to my blog to earn money from my ads. Please do NOT share my graph photo this includes in Facebook groups, or save to Pinterest. Doing so, would allow makers to not have to return to my blog, which would result in a loss of views and income.
C2C XO Wall Hanging Written Pattern:
R1 – 5: Increase in White (5 Boxes)
R6: 1 White, 4 Pink, 1 White (6 Boxes)
R7: 1 White, 5 Pink, 1 White (7 Boxes)
R8: 1 White, 6 Pink, 1 White (8 Boxes)
R9: 1 White, 7 Pink, 1 White (9 Boxes)
R10: 1 White, 8 Pink, 1 White (10 Boxes)
R11: 1 White, 4 Pink, 2 White, 3 Pink, 1 White (11 Boxes)
R12: 1 White, 3 Pink, 3 White, 4 Pink, 1 White (12 Boxes)
R13: 2 White, 3 Pink, 4 White, 3 Pink, 1 White (13 Boxes)
R14: 1 White, 3 Pink, 5 White, 3 Pink, 2 White (14 Boxes)
R15: 3 White, 2 Pink, 6 White, 3 Pink, 1 White (15 Boxes)
We have now reached the width of the wall hanging. From here, even rows will start with a chain 6, and odd rows will start by slip stitching over. Each row will have just 15 boxes until we start decreasing in Row 44.
R16: 1 White, 3 Pink, 6 White, 3 Pink, 2 White (15 Boxes)
R17: 2 White, 2 Pink, 7 White, 3 Pink, 1 White (15 Boxes)
R18: 1 White, 3 Pink, 7 White, 3 Pink, 1 White (15 Boxes)
R19: 1 White, 3 Pink, 7 White, 2 Pink, 2 White (15 Boxes)
R20: 2 White, 3 Pink, 6 White, 3 Pink, 1 White (15 Boxes)
R21: 1 White, 3 Pink, 6 White, 2 Pink, 3 White (15 Boxes)
R22: 3 White, 3 Pink, 5 White, 3 Pink, 1 White (15 Boxes)
R23: 1 White, 3 Pink, 4 White, 3 Pink, 4 White (15 Boxes)
R24: 4 White, 4 Pink, 3 White, 3 Pink, 1 White (15 Boxes)
R25: 1 White, 3 Pink, 2 White, 4 Pink, 3 White, 1 Pink, 1 White (15 Boxes)
R26: 1 White, 2 Pink, 3 White, 8 Pink, 1 White (15 Boxes)
R27: 1 White, 7 Pink, 3 White, 3 Pink, 1 White (15 Boxes)
R28: 2 White, 3 Pink, 3 White, 6 Pink, 1 White (15 Boxes)
R29: 1 White, 5 Pink, 4 White, 3 Pink, 2 White (15 Boxes)
R30: 2 White, 3 Pink, 5 White, 4 Pink, 1 White (15 Boxes)
R31: 10 White, 3 Pink, 2 White (15 Boxes)
R32: 3 White, 3 Pink, 9 White (15 Boxes)
R33: 9 White, 3 Pink, 3 White (15 Boxes)
R34: 3 White, 3 Pink, 4 White, 1 Pink, 4 White (15 Boxes)
R35: 3 White, 2 Pink, 4 White, 3 Pink, 3 White (15 Boxes)
R36: 4 White, 3 Pink, 2 White, 4 Pink, 2 White (15 Boxes)
R37: 1 White, 5 Pink, 2 White, 4 Pink, 3 White (15 Boxes)
R38: 3 White, 4 Pink, 1 White, 6 Pink, 1 White (15 Boxes)
R39: 1 White, 12 Pink, 2 White (15 Boxes)
R40: 2 White, 11 Pink, 2 White (15 Boxes)
R41: 2 White, 12 Pink, 1 White (15 Boxes)
R42: 1 White, 6 Pink, 1 White, 4 Pink, 3 White (15 Boxes)
R43: 3 White, 4 Pink, 2 White, 5 Pink, 1 White (15 Boxes)
R44, Begin Decreasing: 1 White, 4 Pink, 2 White, 3 Pink, 4 White (14 Boxes)
R45: 3 White, 3 Pink, 4 White, 2 Pink, 1 White (13 Boxes)
R46: 1 White, 1 Pink, 4 White, 3 Pink, 3 White (12 Boxes)
R47: 3 White, 3 Pink, 5 White (11 Boxes)
R48: 4 White, 3 Pink, 3 White (10 Boxes)
R49: 2 White, 3 Pink, 4 White (9 Boxes)
R50: 3 White, 3 Pink, 2 White (8 Boxes)
R51: 2 White, 3 Pink, 2 White (7 Boxes)
R52: 1 White, 3 Pink, 2 White (6 Boxes)
R53: 1 White, 3 Pink, 1 White (5 Boxes)
R54: 1 White, 2 Pink, 1 White (4 Boxes)
R55: 1 White, 1 Pink, 1 White (3 Boxes)
R56 – 57: Decrease in White down to 1 Box.
Border: Chain 1, turn. SC into the space just to the right, in between two boxes, (chain 2, SC into the next space in between boxes) around, working a (SC, chain 2, SC) into each corner. When back around, work a final chain of 1, and then join to the 1st SC.
R2: Chain 1. SC into the 1st SC, 2 SC into the next chain space, (SC into the next SC, 2 SC into the next chain space) across, [(SC, chain 1, SC) into the next corner stitch, 2 SC into the next chain space, (SC into the next SC, 2 SC into the next chain space) down the side], (SC, chain 1, SC) into the next corner stitch, 2 SC into the next chain space, (SC into the next SC, 2 SC into the next chain space) across, (SC, chain 1, SC) into the next corner stitch, 2 SC into the next chain space, (SC into the next SC, 2 SC into the next chain space) up the side, (SC, chain 1, SC) into the next corner stitch, 2 SC into the next chain space, (SC into the next SC, 2 SC into the next chain space) across. Slip stitch to the 1st SC, and fasten off.
R3: With right side facing, reattach the yarn in the top right chain space. Chain 3 (counts as first DC + chain 1), skip 1 SC, DC into the next SC, (chain 1, skip 1 SC, DC into the next SC) 14x, chain 1, skip 2 SC, DC into the next SC, (chain 1, skip 1 SC, DC into the next SC) across working the last DC into the left corner chain space. (25 DC)
R4: Turn. Chain 60 (or desired length), then slip stitch into the last SC.
Fasten off. Before weaving in ends, I recommend threading dowel and testing to make sure it hangs the way you like, then weave all the ends in. Thread the dowel through Row 3 of the border with the two outside DC behind the dowel to help keep the shape.
Please feel free to make and sell your own C2C XO Wall Hanging using this pattern, but please DO NOT claim this pattern as your own nor should you sell my pattern, and DO NOT re-publish my photos as your own. DO NOT copy and paste my pattern anywhere, link to it instead.
Join one of our awesome Facebook groups to share your creations, and see what others are up to!
– EyeLoveKnots Crochet & DIY Community
– DIY Home On Rockwood Lane
– Alexandra Lane Lifestyle
Linked Up To…
Handmade Monday #264 – Sum of their Stories
The Really Crafty Link Party #301 – Keeping it Real
Link Up Potpourri #29 – My Bijou Life
Craftastic Monday – Sew Can Do
Happiness is Homemade 412 – Decor Craft Design
You’re the Star Blog Hop – Decor Craft Design
Sundays on Silverado #78 – The House on Silverado
Share the Wealth Link Up #11 – Big Fat Menopausal Life
624th Inspire Me Tuesday – A Stroll Thru Life
Fabulous Party 409 – Lou Lou Girls
Beautifully Made Link Party 200 – Across the Boulevard
Linky Ladies Party #221 – The Purple Poncho
All About Home #129 – Common Ground
Spread the Kindness Link Up #260 – Shelbee on the Edge
Tuesday Turn About #136 – My Wee Abode
{Wow Me} Wednesday #539 – Ginger Snap Crafts
The Loop Scoop #31 – Moogly Blog
The Wednesday Link Party 436 – Oombawka Design Crochet
Team Creative Crafts Link Party #79 – Artsy-Fartsy Mama
Wonderful Wednesday – Oh My Heartsie Girl
Thursday Favorite Things Link Party #526 – An Artful Mom
Creatively Crafty Link Party #313 – Try It – Like It – Create It
Encouraging Hearts & Home Blog Hop – My Slices of Life
Grace at Home No. 454 – Imparting Grace
Traffic Jam Weekend Link Party #310 – My Bijou Life
Home Matters Linky Party #365 – Modern on Monticello
Create, Bake, Grow & Gather Party #505 – Shabby Art Boutique
Funtastic Friday Link Party #370 – Simply Beautiful by Angela
Friday with Friends #58 – My Hubbard Home
A Morning Cup of Joe – The Cottage Market
Saturday Sparks Link Party 500 – Pieced Pastimes
Farmhouse Friday #239 – County Road 407
One More Row Free Crochet Link Party #39 – Loops and Love Crochet
The post C2C XO Wall Hanging – Free Crochet Pattern appeared first on EyeLoveKnots.


